
Group Leader Guide
For group leaders and instructors. You are responsible for the students in your group: getting them signed up, keeping their training current, and knowing where they stand.
You can do everything a student can do. This guide covers only the extra screens and actions you get on top of that. For the student side, see the Student Guide.
What a group leader can and cannot do
The portal is designed around your assigned groups. Confirm the group shown on the screen before taking action. For sensitive records, ask an administrator to review anything that looks outside your group.
You can:
- See and manage the students assigned to your groups
- Add students
- Manage a student's training history from their detail screen
- Enroll or unenroll a student from a published course
- Mark a departed employee's account inactive and reactivate it later
- Export training data for students in your assigned groups
- Record training a student completed elsewhere
- Email your students
- Edit the data for your assigned group
- Open organization group reports at /reports/
You cannot:
- Treat a student outside your assigned group as an administrator review item
- Browse the full course listing. The portal tells you directly: "As a group leader, you can add students and manage training, but course listings are restricted."
- Use the organisation-wide renewals list. The portal says: "As a group leader, you can email students and manage training history from user details, but the global renewals list is restricted."
- Edit another group's data without administrator review. Use Edit Group Data only for groups assigned to you. If another group's details appear, stop and ask an administrator before editing anything.
If you need something on that second list, an administrator has to do it.
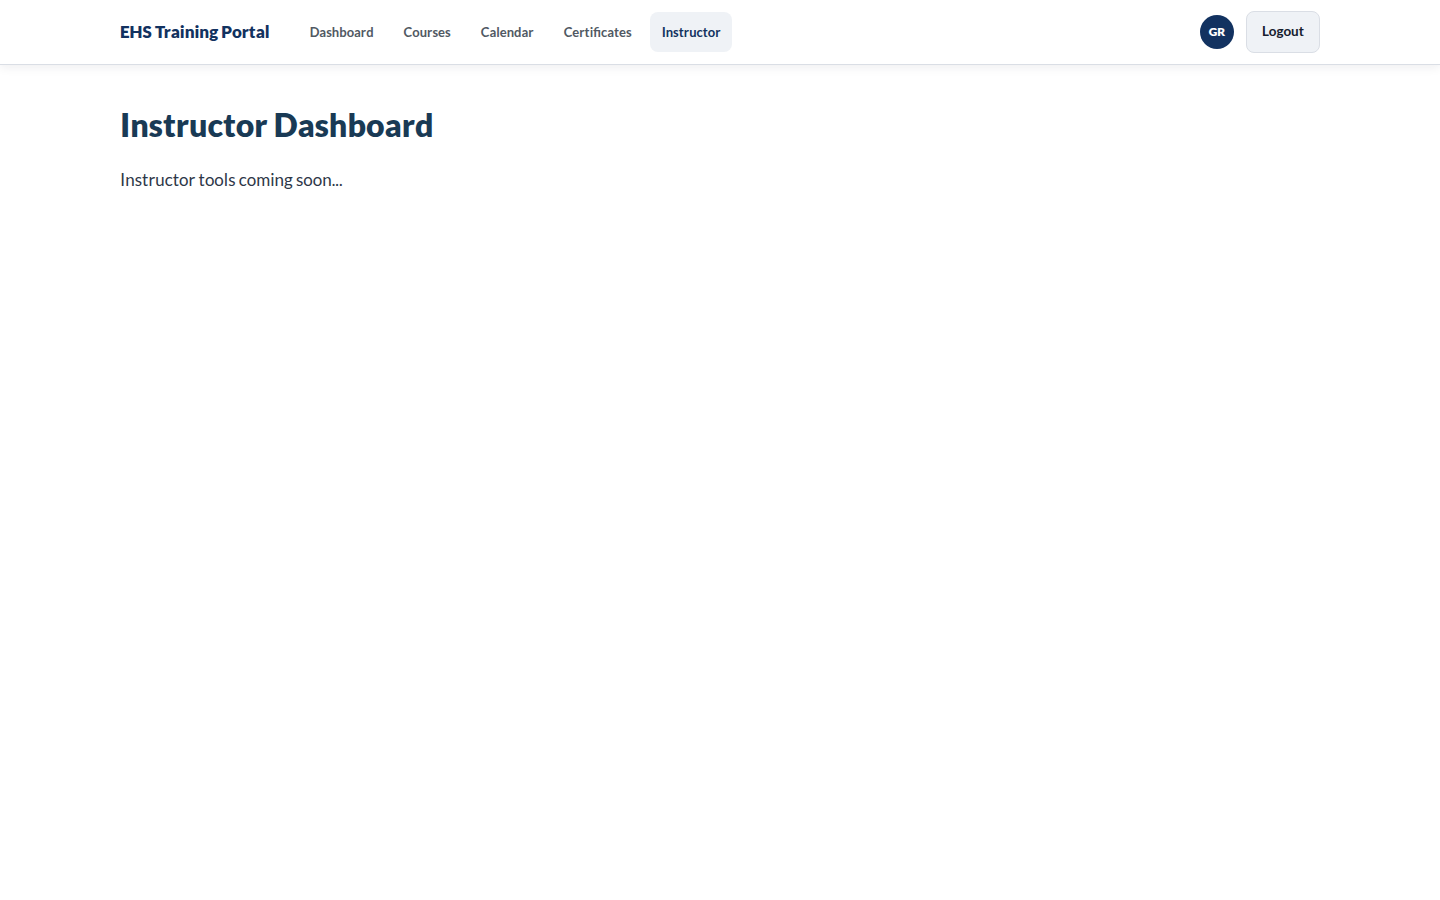
Your dashboard
The instructor dashboard is at /training/instructor/, and it is where you land after signing in.
Related screens:
| Screen | Where it lives |
|---|---|
| Instructor Dashboard | /training/instructor/ |
| Classes | /training/instructor/classes/ |
| Students | /training/admin/users/ |
| Group reports (organization) | /reports/ |
Organization reports
Reports is the organization reports area for group and team structure and detailed group reporting. You must be signed in. Guests see a message that login is required.
This is not the same as Reports & Analytics inside the training admin area, which is completion and renewal reporting for training records. Use organization reports for group structure and team reports; use the training admin reports when you need completion, renewals, or CSV export for your students.
From the site home page, administrators and group leaders may also see a View Reports control that opens this same organization reports page.
Student Management
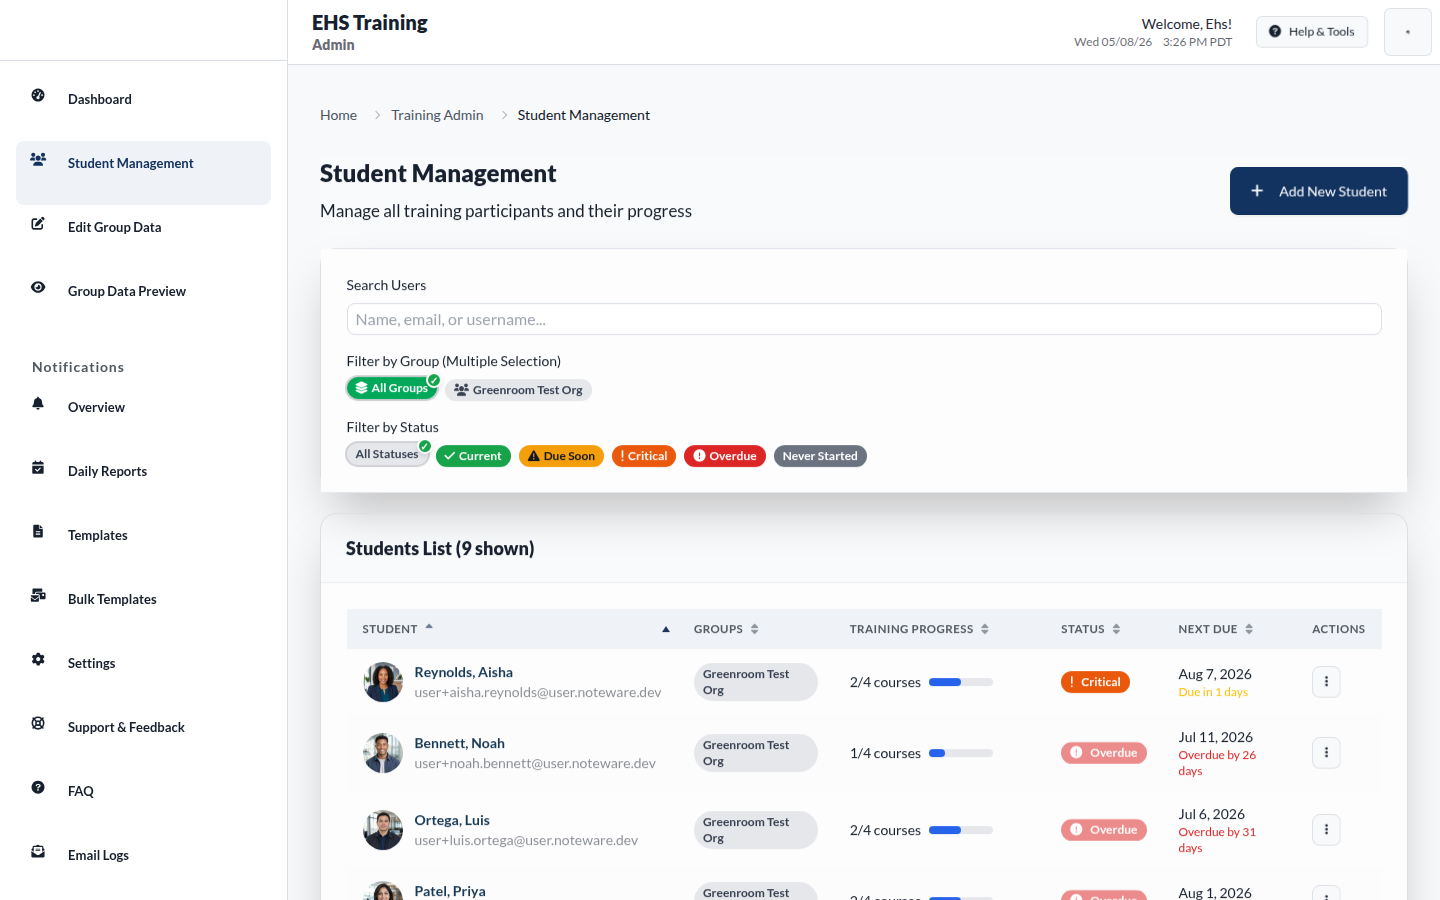
Student Management is the screen you will use most. It lists your students and their training standing.
What you see on the Student Management screen
- Across the top: filters, including Filter by Status with choices such as All Statuses, Current, Due Soon and Critical, plus group filter chips under Groups & Filters.
- Main area: one row per student, showing Groups, Training Progress, Status, Next Due and Actions.
- Per row: an action to open that student's detail screen.
The list is designed to show students in your groups. Confirm the group label on the row before opening a record or making a change.
Tip: Filter by Due Soon at the start of the week and Critical when you need to know who is actually out of compliance right now. Those two views answer most questions without reading the whole list.
A student's detail screen
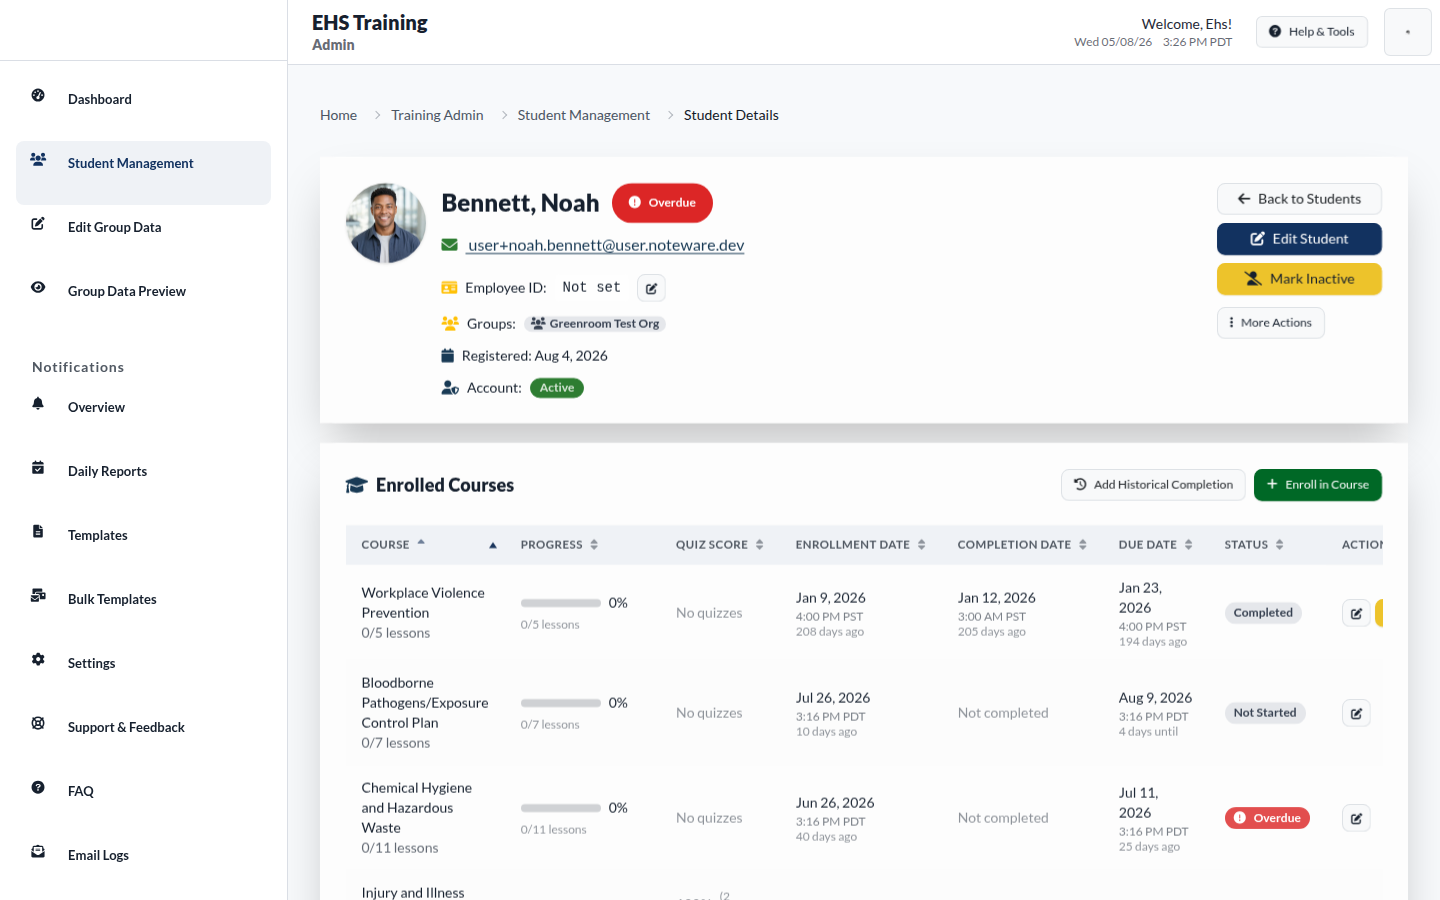
Open any student from Student Management to see their full record. In the demo sandbox, Noah Bennett is a good example: multi-year IIPP cycles, mixed modalities (online, workshop, hybrid), overdue and due-soon rows on one person.
What you see on a student detail screen
- Across the top: photo (when set), name, email, group, and overall standing.
- Main area: their courses, each with Completion, Completion Date, Completion Type (online, in-person, workshop, webinar, hybrid), Enrollment and standing such as Completed, In Progress, Overdue or Not Started.
- Also shown: prior cycles stay on the record when training renews annually.
- Actions: Add Historical Completion, and Notes for anything you want recorded against the student.
Demo sandbox uses Greenroom photos and mixed training history so every status and modality can appear.
| Course | Modality | Status | Cycle | Note |
|---|---|---|---|---|
| IIPP | Online | Completed | Cycle 3 (current) | Prior cycles stay on the record |
| IIPP | Hybrid | Completed | Cycle 2 | |
| Chemical Hygiene | Online | Overdue | Cycle 1 | Past due, not finished |
| Workplace Violence | Workshop | Completed | Cycle 1 | Not LearnDash self-service |
| Bloodborne Pathogens | Online | In progress | Cycle 1 | Due soon |

Recording training completed elsewhere
Add Historical Completion is for training a student genuinely did, but not in this portal. Classroom sessions, training from a previous employer, or a course completed before the portal existed.
You provide the course, completion date and completion type. The saved record appears in the student's history and updates the renewal information shown on the detail screen.
Warning: A historical completion sets the clock for that student's next renewal. Entering the wrong date does not just look untidy, it moves their next due date and can make an out of date student appear compliant. Check the date before saving.
Enrolling and unenrolling a course
Open Student Management and select a student. In the Enrolled Courses card, select Enroll in Course, choose a published course, and confirm. To remove a current enrollment, select the user-minus action beside that course. Removing access does not delete completion or archived history.
Offboarding an employee
When an employee leaves, open their detail screen from Student Management and select Mark Inactive. This preserves the account and all active and archived training history, but blocks portal sign-in. The record remains visible for reporting and exports. If the employee returns, select Reactivate Account on the same screen.
Do not delete the account or training records. If the person should no longer be assigned to your group, ask an administrator to update their group assignment after marking the account inactive.
Exporting your group's training data
Open Reports & Analytics or Settings and select Export Data. The downloaded CSV contains one row per employee and training-history record, including employee ID, groups, account status, course, completion, due and renewal dates. Group leaders receive only students in their assigned groups. Inactive employees remain in the export so historical records stay auditable.
Adding a student
New students are added from Student Management. Once the account exists, the portal emails them a welcome message with a link to set their own password. You do not set or share their password yourself.
If a student says the welcome email never arrived, see Troubleshooting before creating a second account for them. Duplicate accounts split a person's training history in two.
Group data (staff names, locations, safety)
This is the self-service area for information about your site or group, not about individual students. What you enter here (safety officer names, phone numbers, evacuation locations, medical facilities) can appear inside course content so every learner sees the right people and places for their workplace.
| Screen | Where it lives | What it is for |
|---|---|---|
| Edit Group Data | /training/admin/groups-data/edit/ | Update staff names, contact details, locations, and related fields |
| Group Data Preview | /training/admin/groups-data/preview/ | How that information appears in shortcodes (administrators) |
| Safety & Emergency Information | /training/admin/groups-meta/ | Older entry point for the same kind of group safety details |
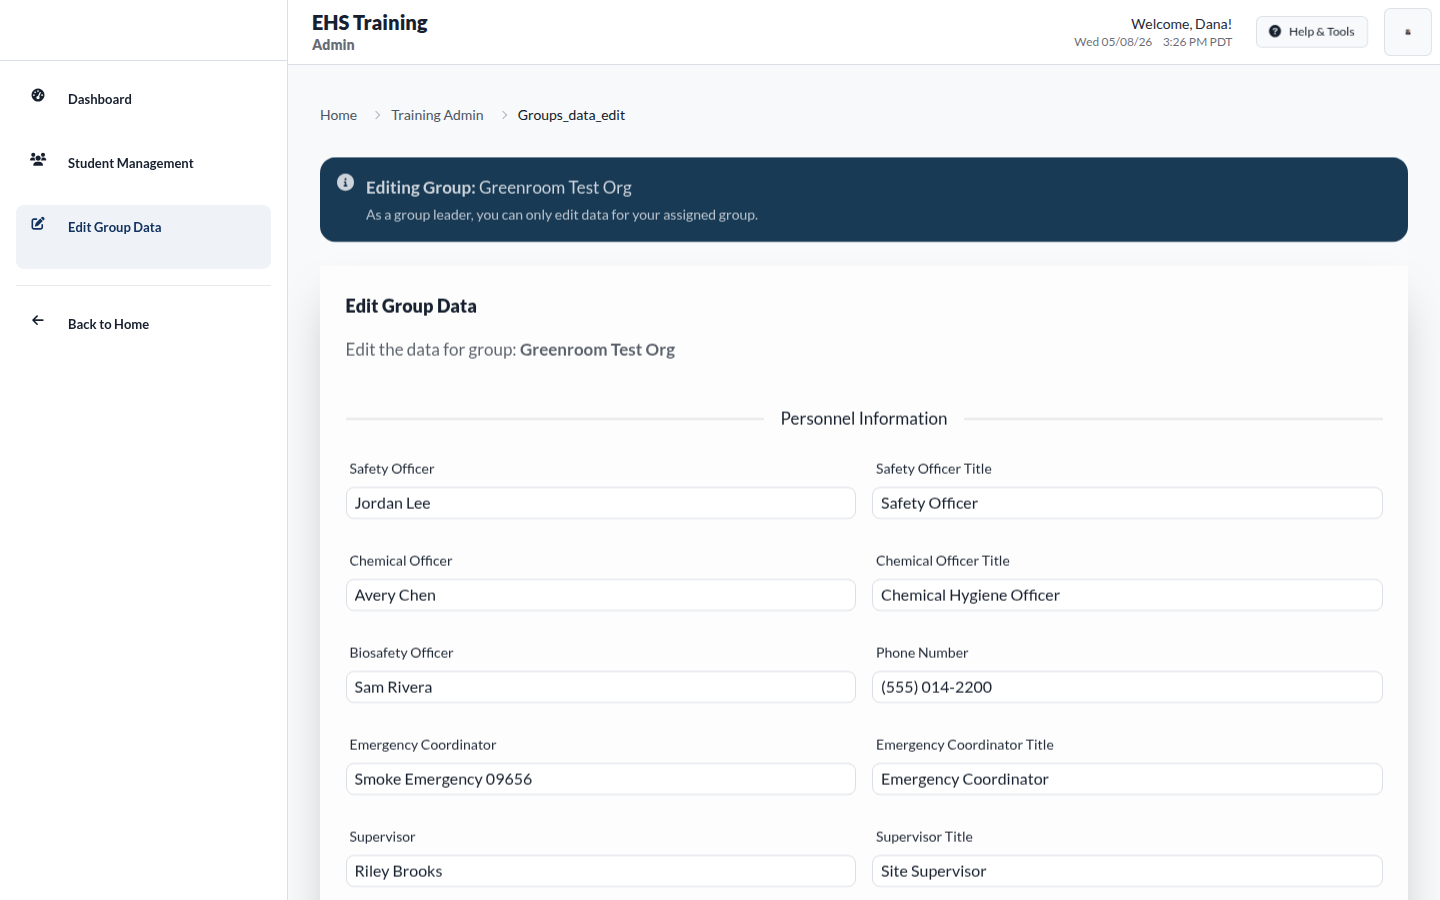
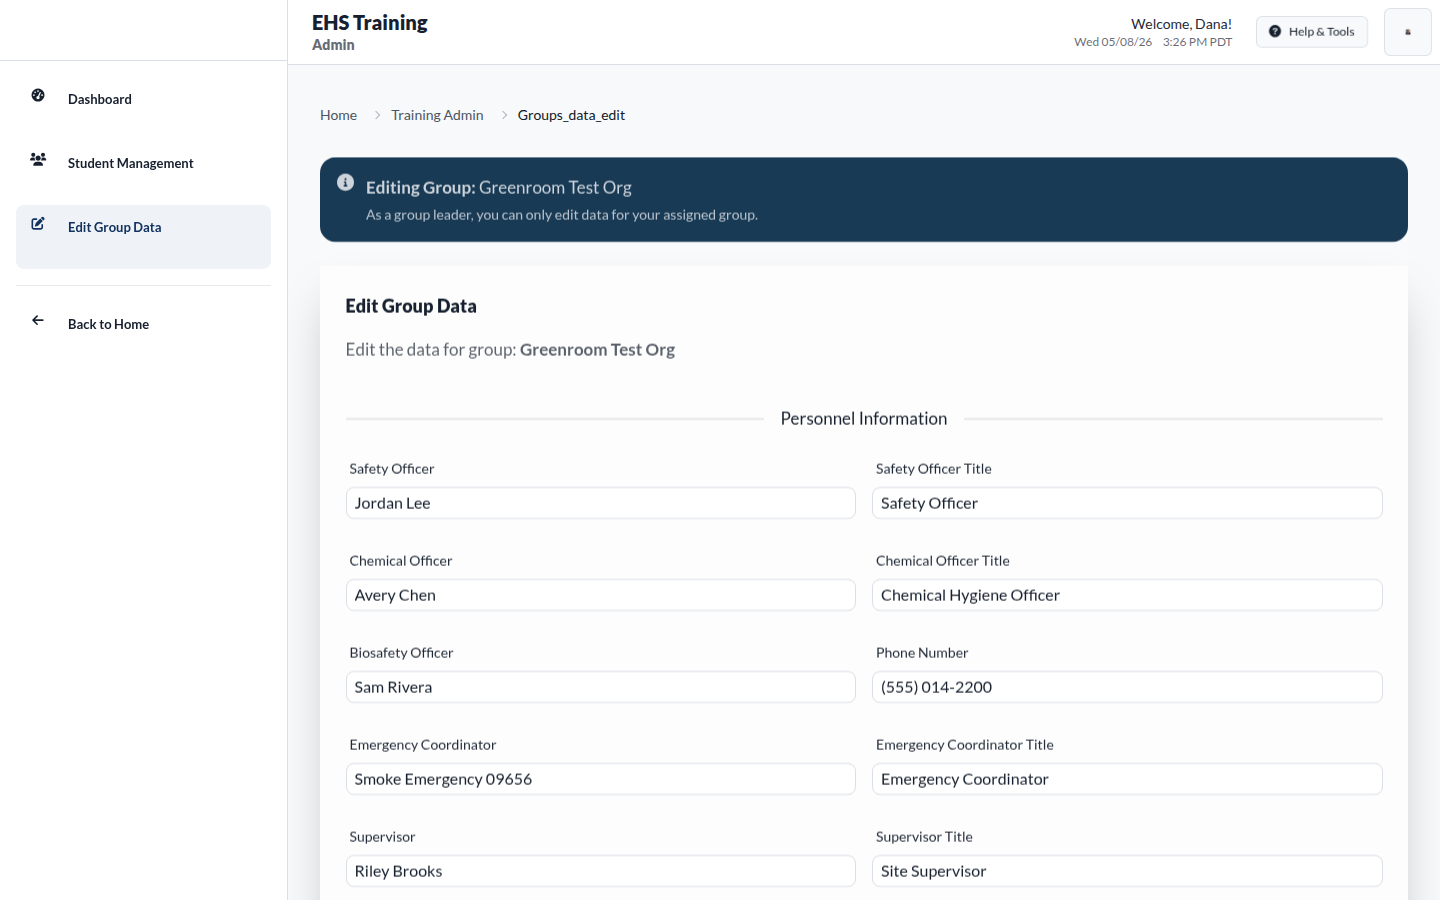
Use Edit Group Data only for groups assigned to you. As a group leader the screen shows an Editing Group notice with your group name. If another group's details appear, stop and ask an administrator before editing anything.
Open Edit Group Data
- Sign in as a group leader (or administrator).
- Open Edit Group Data from the admin sidebar (pencil / edit icon, label Edit Group Data).
- Confirm the group name on the screen. Administrators can switch group with Switch Group. Group leaders only see their assigned group.
Update staff names and contact details
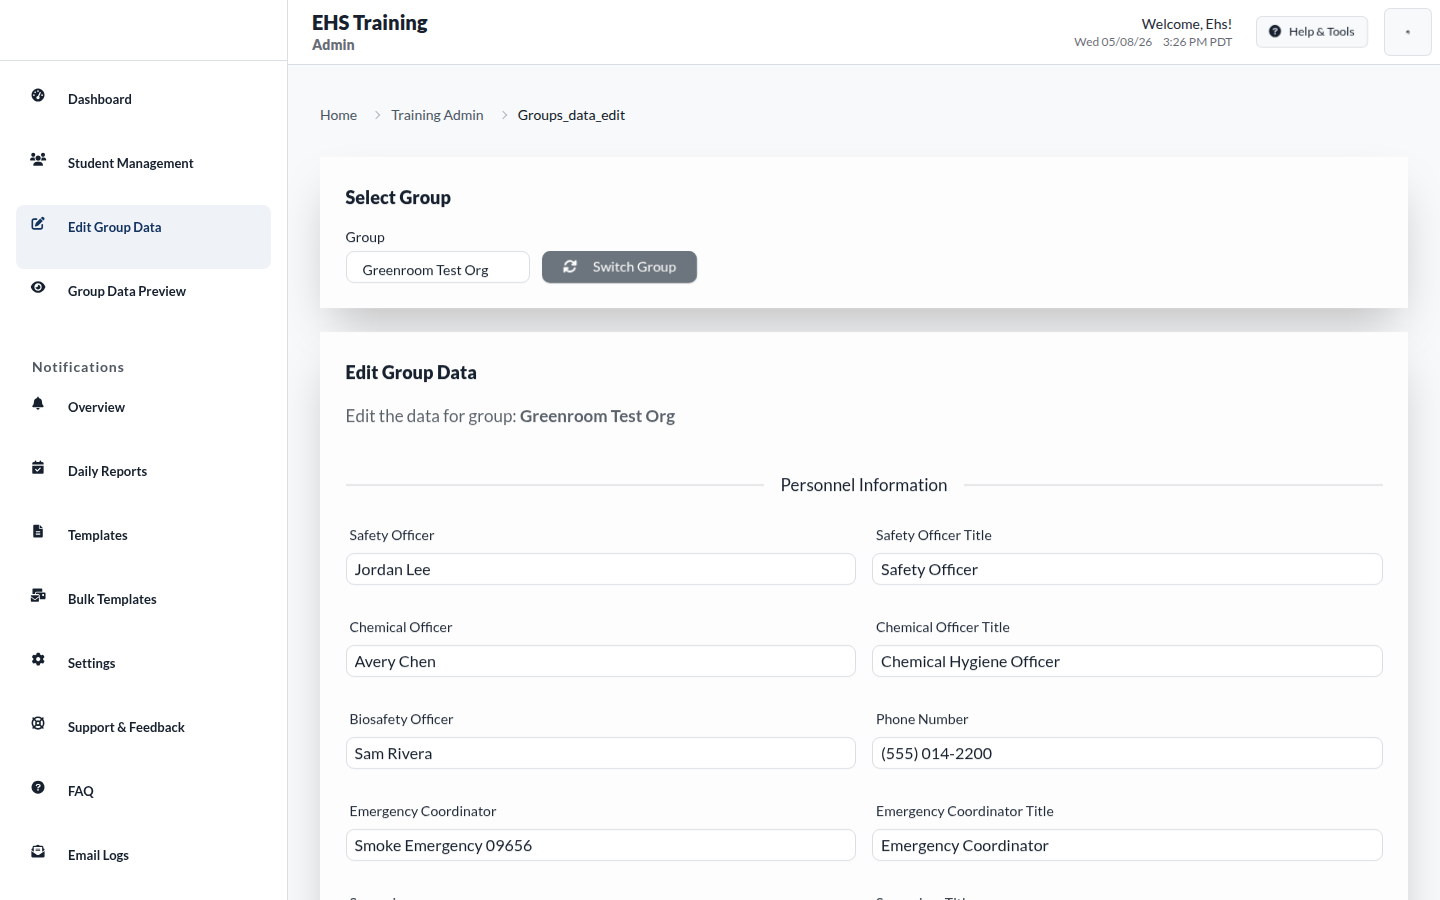
On Edit Group Data, under Personnel Information, fill in the people and contacts for your site:
| Field | What to enter |
|---|---|
| Safety Officer (+ Title) | Name and job title for the safety contact |
| Chemical Officer (+ Title) | Name and title for chemical hygiene / hazmat |
| Biosafety Officer | Name for biosafety contact |
| Emergency Coordinator (+ Title) | Name and title for emergency coordination |
| Supervisor (+ Title) | Site supervisor name and title |
| Phone Number | Main site or safety phone |
| EPA ID | EPA identification when your site uses one |
| Closest Medical Facility | Name of the nearest clinic or hospital |
Update locations and evacuation information
Scroll to Evacuation Information (and related medical address fields):
| Field | What to enter |
|---|---|
| Evacuation Location Description | Where people assemble (for example the north parking lot) |
| Evacuation Landmarks | Landmarks and directions so people can find that location |
| Evacuation Map | Optional image upload of the map (JPG, PNG, or GIF) plus alt text |
| Closest Medical Facility Address | Full address for the nearest urgent care or hospital |
| Procedure Information | Site safety procedures shown in training materials |
| General Group Information | Optional free-text notes about the group |
1200 Industrial Blvd
Anytown, CA 90000
Save and confirm
- Select Save Group Data at the bottom of the form.
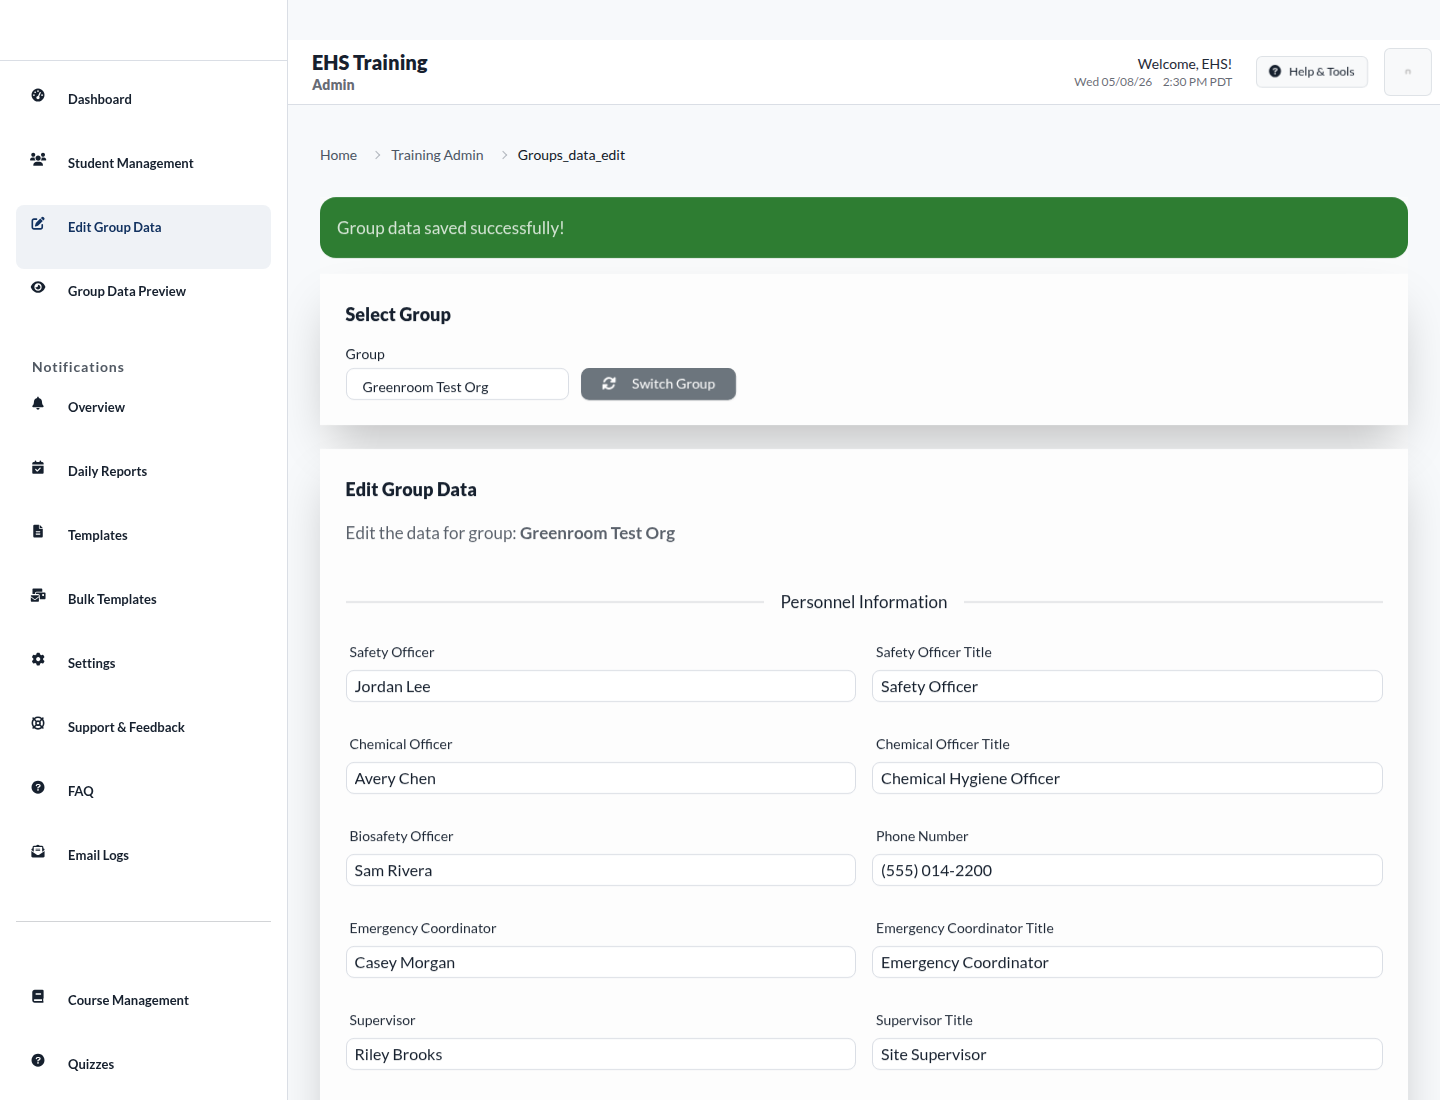
- Confirm it worked: a green banner reads Group data saved successfully!
- Re-open the screen later and check that names and locations still match what you saved.
- Optional: open a mapped lesson as a student in the group and confirm the same values appear in the lesson content.
Tip: Keep titles and phone numbers current when staff change. Course materials that pull this data will show whatever is saved here for the learner's group. There is no separate publish step.
What lessons show after you save
Edits are live. Learners in the group see them the next time they open a lesson that includes group shortcodes (for example IIPP Fire & Emergency Action Plan, and workplace violence emergency lessons). Mapped fields include:
- Officer names → safety / chemical / biosafety shortcodes in the lesson body
- Evacuation location, landmarks, and map → evacuation block in the lesson
- Medical address → closest medical facility block in the lesson
Group Safety Contacts
The contacts below come from Edit Group Data for the learner’s group.
Evacuation Procedure
Description:
Assemble in the north parking lot, clear of the building and vehicle lanes.
Nearby Landmarks:
Near the blue loading dock sign and the visitor parking canopy.
Closest Medical Facility
Address:
Valley Urgent Care
1200 Industrial Blvd
Anytown, CA 90000
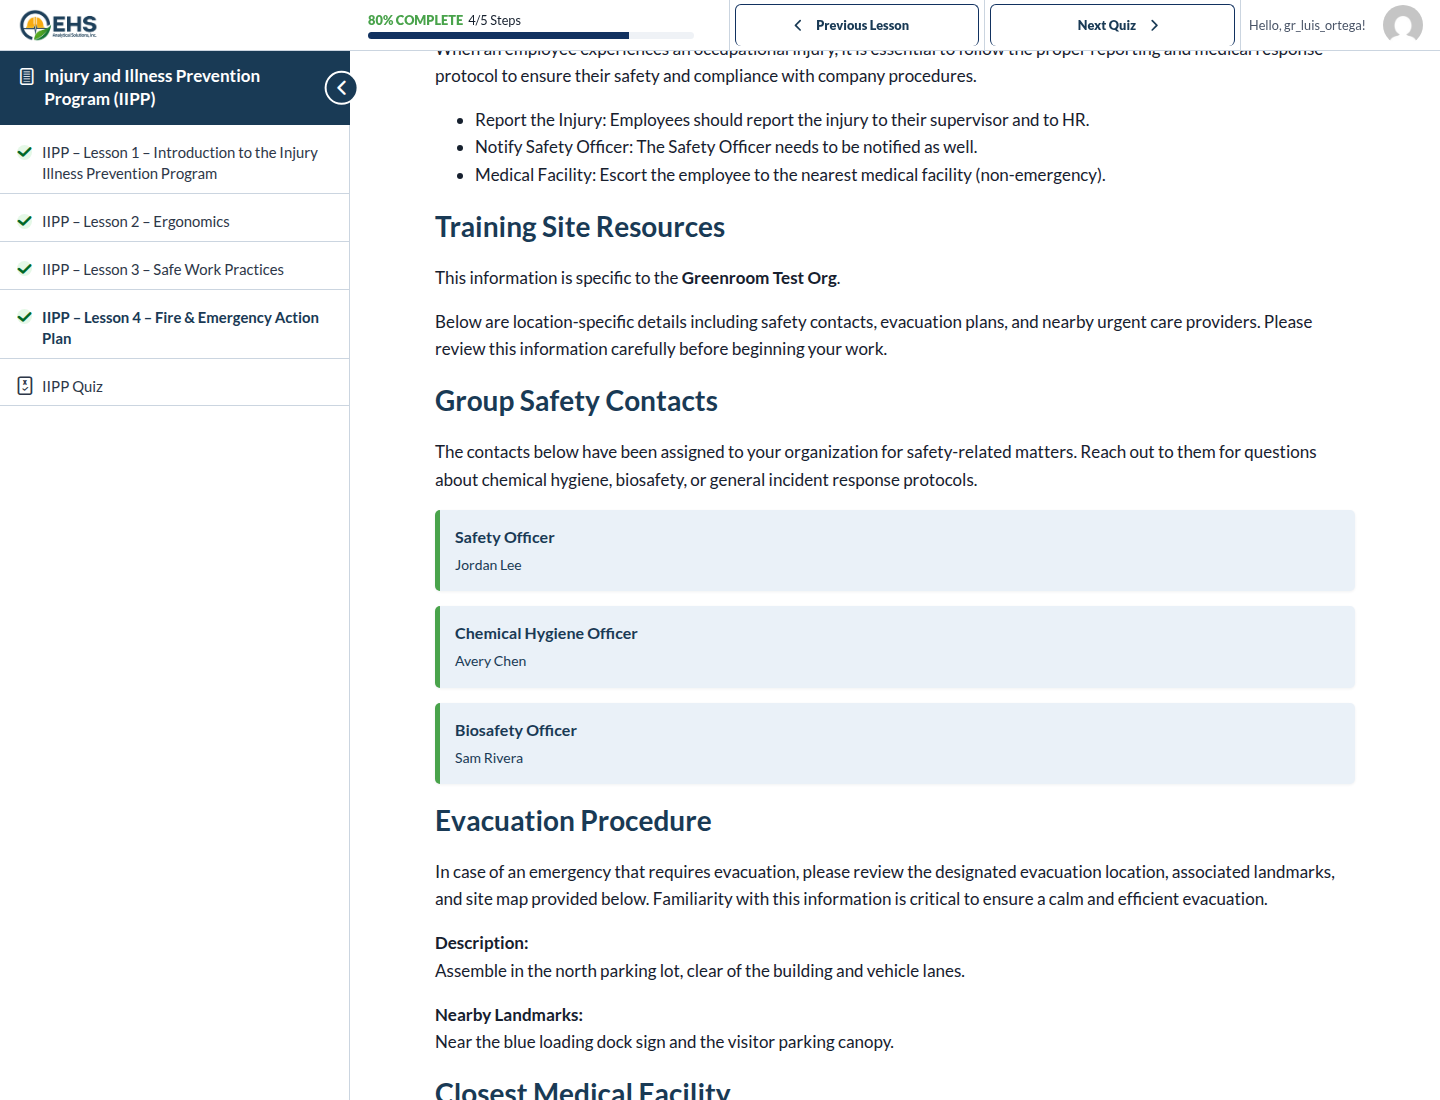
If a student still sees old names, confirm they belong to the group you edited, then have them refresh the lesson page.
Warning: Do not invent or copy another site's officers or evacuation instructions into your group. Wrong location or contact data in training content is a safety problem, not just a paperwork issue.
For a numbered walkthrough, see Common Tasks: Update group staff names and locations.
Emails your students receive
You do not have to chase people manually for routine reminders. The portal emails students automatically when training is due soon, when it becomes overdue, and when they complete something.
Administrators and group leaders also receive a Daily Report summarising recent activity, so you can see completions without opening the portal.
You can additionally email your students directly from their detail screen when something needs a human nudge.
Where to go next
- Step by step walkthroughs: Common Tasks
- Something is not working: Troubleshooting
- Quick answers: Frequently Asked Questions